
The Caboose - Random ramblings about my "TT- Tracks©" Modules
 |


|
|||||


 |
||||||
As this page was getting a bit long it has been split into pages by years.
- 2023
- 2022 Page
- 2020 - 21 Page
- 2019 Page
- 2018 Page
- 2017 Page
- 2016 Page
- 2015 Page
- 2014 Page
- 2013 Page
- 2012 Page
- 2011 Page
January 18, 2011
The first posting about TT-Tracks was made on the TT-Nut site on this day.
March 28, 2011
I have on order enough track to make the six modules shown in the following picture: The
red track at the top shows the first planned track change to join up the end of the third track.

The third line will be made from standard sectional track on a roadbed. When I figure out
what roadbed works best (HO or N, cork or foam or ??) I will post the results on the Ideas page. I
have not decided if I will duplicate the third track on the right hand corners. Triple track on both
ends might look too much like a race track.
I was thinking scenically of showing it a as track under construction. With finished ballast at the
front and progressing to the rear down to bush with a line of survey stakes through it. Does
anybody know where I can find some TT Scale construction equipment? Found some Match Box
pieces that will do for now.

After that works it will be time to experiment with a foam module. A double wide with three through tracks and three yard tracks can be used two ways. Connected the normal way it gives a small three track yard inside the loop and another storage track connected to the third line.. Connected backwards you would end up with a four track yard connected to the third line. This setup needs a backdrop. (heavy blue line) The single spur on the former back module now leads nowhere. With careful planning of scenery on the corner you could add a piece or two of track to make a short spur.

After that who knows. Hopefully by then there will be other modules to join in a setup and that will inspire more ideas.
The package arrived today (April 12, 2011). After customs sat on it for 11 days Canada post
only took a day and a half to get it to me. The track is setup on the dining room table (TT stands
for 'Table Top' doesn't it
| Progress on a Foam module.
I had time this Friday (April 22) and Sunday (April 24) to work on modules. The weather was good on Friday, a bit cool and windy but OK for painting and gluing. Sunday was not so good so most work was done inside. |
| I assembled the foam module (cut from a Woodland Scenics 1" foam sheet and then glued
the feet on it) and then installed front track - I drew a line on the module marking the front edge
of the roadbed and then glued the track down to the module. Then it was painted a brownish colour. It was what I could find in the inexpensive 'Off-tints' at Rona (Canadian Home Depot which we also have up here but Rona is closer). I left the glue space for the back track clear of paint but otherwise painted all surfaces (top and bottom and all sides) of the module. Here is the painted module with the second track being glued into place. Notice the two spacing jigs made according to the idea shown by railtwister. 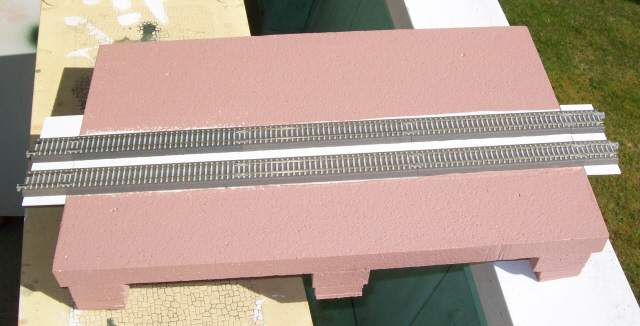
|
| Here is the module with basic scenery and a front fascia installed. The scenery was done quick and dirty - I masked off the track. Then I used spray glue to glue on the first layer of grass. Spray the module, heap the grass on it and then press down on the grass. Shake of the excess into a paper box top for reuse. The corners do need a bit of touch up but I will do that when I do the ballast. More scenery material needs to be added to remove the billiard board effect. A clear space was left on each side of the track for more ballast. I didn't have a dark enough grey so I had to order it in. Should be here next weekend. After I add the ballast I will edge that with a line of brush and shrubs. The fascia is .080" styrene glued on the front of the module. When I use up my package of .080" I will go to a lighter styrene (.060"). The colour is what I had - Tamiya racing green. It is a nice colour but a bit expensive for a small can. I will find a better priced colour at Rona next week. Notice the feet sticking out under the fascia. This fascia is 2 1/4" deep. The next ones I make will be 2 1/2" deep and I will paint the feet black to make then less visible.  |
| Here is my current stack of modules in progress.
On top is the most finished module. The painted module under that is the wood topped module I made. It will have the right hand crossover installed on it. I will build another one of these for the matching left hand crossover. The next two modules are blue foam side modules. The bottom four are blue foam corner modules. The wood plate glued to the top one is for the terminal block for the corner wiring. I will hide this in a grove of trees. Since this picture I have added another foot on the two outside edges of the corner modules. This gives seven feet per corner module: one at each corner, one in the middle of each outside edge and one in the middle. Counting the modules, I have enough for an oval now with two side modules. As I am going to build another wood topped module I will also need to build another foam topped module to make an even oval. I will end up with an oval almost eight feet long. 
|
|
With all that planned I should end up with: 
|
| Progress on the Corners. Week of April 24 to 30, 2011 Today I am gluing down the inner circle of track on the corner modules. After this is dry and a short test run, I will start on the outer circle. One module will be done at a time using the space jigs. That will take four days to do so with a bit of luck this time next week I will have all four corner modules ready to run and scenic. 
|
| Track is down. April 30, 2011
Both circles of track are down on the four corners and basic testing with a battery was done. It took a while to get the second circle of track glued down as my spacer jigs kept breaking. Eventually I remade them using ABS and a better plastic glue (Pro weld). These have not failed under use - yet. After basic testing the corners were painted. 

|
| Siku Models
Siku a maker of die cast model in various scales makes a few items that they say are 1:120. This is the Diesel and gondola set they make. I think they look a bit big but they might be Ok in a scrap yard scene. 
|
| Modules with basic Scenery. May 1, 2011
Had a busy day putting some basic scenery on a corner and a side module. My idea of running ballast up the side of the track base is not working as well as I hopped. Will back off on that idea for now. The step in the module faces came about because I have the track located I the wrong position on the side module. On the corner the dirt area is where the third track will go when my next shipment of track arrives. The tree line in the back is a Woodland Scenics hedgerow Scene. Looks OK but needs to be set into the surface. The lone tree like object near the centre is a failed tree making attempt. I think that I will cut it up and use the branches as underbrush. Although you cannot clearly see the difference, the grass in the front is is Woodland Scenics blended green. In the back there is a mix of static grass added. 
|
| Old and New
An image showing old and new equipment. There is a world of difference in operating quality. I can now see that I need to acquire a new steam engine. Any suggestions. Looking at the two modules it is apparent that we need to add scenic elements in front of the trains as well as to the rear to make the module look bigger. 
|
| Working with Foam
I am really starting to like working with foam. Not only are the modules very light but they are also easy to fix. The too wide straight module was trimmed with a sharp knife and the front fascia glued back on. A five minute fix! 
|
| Signal Tower
I am starting to think that this tower may be N Scale. Still looks good so I will use it for now. The base has been cleaned up so that it can be set into the foam.  |
| A module before scenery
Here is a corner module before the basic spar glue scenery step. The track and other areas that will receive track have been taped over. Then a quick coat of spray glue is applied to the area to receive scenery and the basic scenery cover is sprinkled on and lightly patted down. Because the spray glue dries quickly one area at a time is done. For this module the strip at the front was done first, then the area to the outside of the curve and then the area inside the curves. Doing it one area at a time allows you to use different textures in each area. The front strip and inside the cure are basic grass. The area outside the curve has a slightly rougher texture. After the spray glue has dried a while the tape is removed. Then I apply ballast along the edges of the track and dirt where I want dirt roads or where track I do not have yet is going to go. Again let things dry then apply a second layer of scenery to the grassy areas. I start by flooding the area with scenic cement (diluted acrylic matt medium) then sprinkle on grass, weeds, shrubs, bushes. As the scenic cement flows into the ballast / dirt areas the trick here is to be careful to not sprinkle the grass to far into those areas. A bit of overlap is good. Clumps of bush receive a final dribble of scenic cement with an eye dropper. Set the whole thing aside to dry completely over night. When dry shake off any loose scenery material into a container for reuse. 
|
| Four Corners Drying
Here are the four corners after scenery material was applied. They are drying so some of the colours are darker than they will be dry. 
|
| Fences
I would like to fence some of the right of way. Here is a wire on wood post fence. The posts are about a scale 6"x 8" drilled for five wires. The posts were drilled, stained then planted. Then a needle was used to thread gray thread though all the holes. The effect is interesting but tedious to do Not sure how much more of this type of fence I will do. 
|
| May 26, 2011
Yesterday (May 25th) I received my shipment of BG3s (and a few other items) from Euro Train Hobby and was finally able to layout out my crossovers. It took some juggling of track pieces to get the ends to line up right. I think that I am a half mm out on the center track on the left but there is no way to eliminate this. For now I will have two crossover modules, the one shown and the mirror image. The special rail joiners shown are joiners with half the base cut off. The standard special joiners come with the turnouts. The special insulated joiners are made buy cutting off part of the base of a standard insulated rail joiner. 
|
| June 5, 2011
After a dismal Spring (not quite the wettest ever but close) we finally had a nice weekend. Much progress was made. Track work and basic scenery on the two wood crossover modules was completed. Then everything was assembled and tested. The surface I used was not quite wide enough for the modules so they hung over the edges. I will scrounge a pair of 3'x4' plywood pieces to resolve the issue. Many issues were found with differing module heights. I will use the power module as a reference and adjust everything else to match. 
|
| First Run
Here is a short video of the first run. If you look closely you can see the hi-tech power supply in the upper left corner. (Copper tops work quite well) |
| June 5, 2011
After some play time work resumed. Fascias were applied where needed. Here I found to my dismay that one of my wood topped modules had bowed up. I pinned the fascia on to reduce this problem. An experiment with static grass on my first straight module was removed. It came out too dark. I redid it in my now standard grass method. (First layer spray glue. Second layer - flood area with scenic cement and then apply grass. Third layer flood again with scenic cement, add brush and more grass). Gives a nice deep grass look. Started on third line on left end. You can see the track in the Tillig roadbed lying on the module. I need to put a .030" layer of styrene under the track pieces before gluing on. I think spraying a darker gray colour would also help. 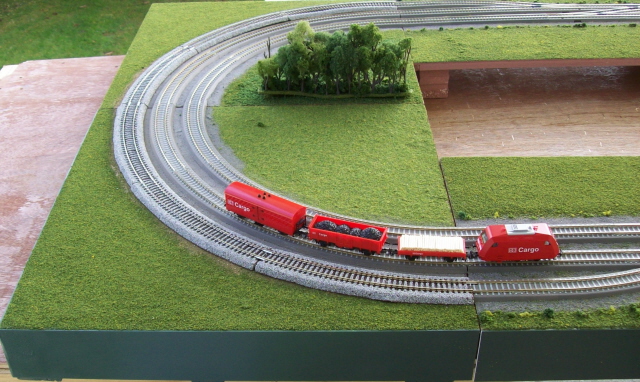
|
| June 13, 2011
Despite a busy weekend time was found to add a coat of paint or two to the two plywood surfaces I made. I should have spent another $10.00 for a better grade of plywood. This stuff is rough! |
July 25, 2011

Here are the current state of some of the modules. You can see some of the issues. I need to find a paint that matches the fascia colour to hide the cut edges of the fascias. You can see the open backs of modules. That is why I think they need a fascia. The third line of track is sitting on the left modules. I sprayed the ballast pieces to get rid of the salt and pepper ballast effect but it ended up a lighter grey than the bedding track. I haven't decided if this is a problem or a feature. The starter set train is running on the third line. Power by Duracell 9V battery. The beige surface under the modules is the plywood I cut to make a 40" wide module surface. It has bowed a bit but is useable. If I decide that the bow is too bothersome I will start over with a better grade of plywood. |
July 31, 2011

Weather was great today. Was able to paint and work on scenery. Made backside fascias today. Really improves the look of the display. Worked on all the joints where I added grass to try and disguise the joins. Cleaned them out so they all connect well. Added some trees and more scenic detail to some of the modules. Tomorrow while scenery glue dries on an HO scale Thomas layout I will check out equipment on the display. I have a few boxes of older stuff. Time to see what actually runs |
August 1, 2011
Another great day to work on the display. I started by fixing mistakes. When I put the track
down on one module I rushed too much and did not get one rail in a rail joiner. After fixing that I
started testing equipment. I acquired a collection of TT more than decade ago and have not been
able to run it until now. There were several locomotives:
and some Triang. A GWR 0-6-0 Panier tank, a Castle Class 4-6-0+T, two passenger cars and a lot of track. The overall display looks OK: 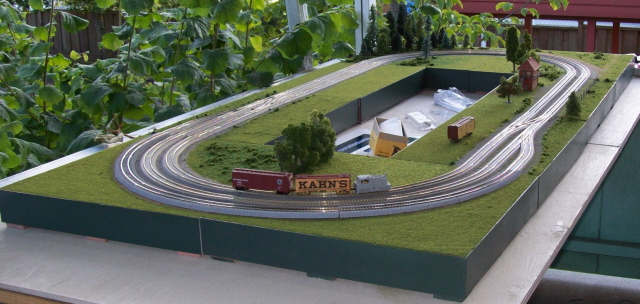
Signs were added and a bit of US equipment was run. 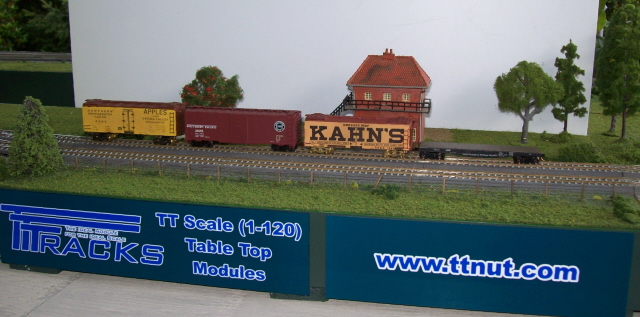
Not a bad day. |
| August 2, 2011
Another great day to work on the display but I didn't get much done. Too many important issues
to deal with. Happily all have turned out well for now.
I worked on the turnout that had issues. I traced it to poor connections between the points, stock rail and point rail. I soldered a small jumper (decoder wire) between the stock rail and the point rail. You can barely see the wire. (Red arrow) The points still have a very loose connection to the point rail by a railjoiner. For now I will leave it alone. If this still acts up (locomotives stalling) I will solder a very fine wire between the point and point rail. 
|
| August 14, 2011
Not that great a day to work on modules. The weather was not cooperating and neither was I. After a long slow start to the day I started putting trees inside the curves on the right hand modules. I used Woodland Scenics Forest Canopy. Following their instructions does work but as usual I deviated from them. I tried spray glue instead of dipping in scenic cement. Worked but not enough better to justify continuing that way. You are supposed to sprinkle the foliage on. I dipped the tree armatures instead. That worked OK until the remaining foliage got wet with scenic cement (used that as scenery on a module). There was not enough foliage in the package so I added some from stock on hand. I used the colour included in the kit as well as different colours and textures from Busch, Scenic Express and others. The semi finished grove of trees showed where the foliage had not adhered so following instructions I sprayed with Scenic Cement and sprinkled on additional foliage, again varying colours. Sprayed on more Scenic Cement and let dry over night. The results look pretty good. . 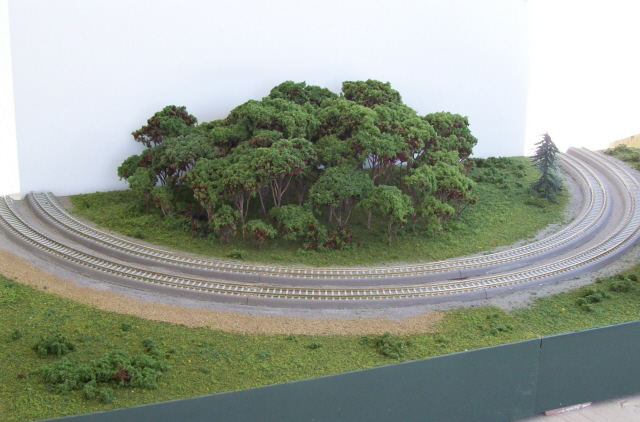
Speaking of scenic cement I find that the Woodland Scenics product is a bit thin. I have been buying Scenic Express concentrated scenic cement and making my own. You are supposed to dilute I four parts water to one part glue. I am only diluting with three parts water to make a glue with a bit more stick. |
| August 15, 2011
A better day to work on the modules. I have used several different types of trees on the modules. Here is what I have used. This picture shows four types of tree: (Note - all the modules have a piece of styrene behind them to act as a backdrop)

We have seen the forest canopy earlier. This corner is filled with more home made bottle brush tree using raffia for the branches. I used various colours of Busch, Noch, Scenic Express and Woodland Scenics ground foam for the foliage. Some colours are good, some will not be reused (avoid any colour called Spruce!). Some trees came out OK, some need work. In a forest they average out and look OK. Not as fast to make as I would like but it is possible to production line them to speed up the process. 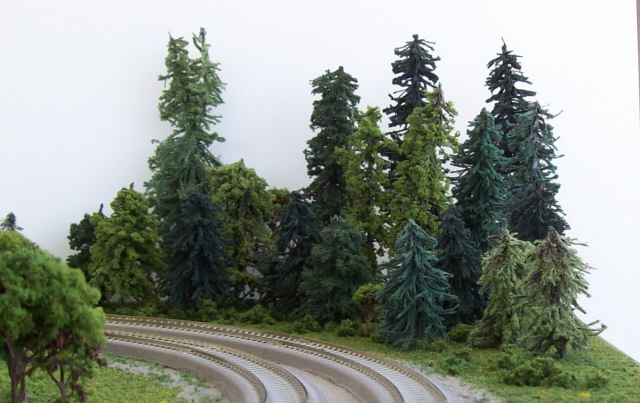
Here is another product from Woodland Scenics - their Hedge Row. Looks pretty good right out of the package. The only problem is that the base is warped badly. I put a heavy bead of WS Foam Glue on the bottom and then pinned it to the module surface with t-pins every inch or so. Let dry overnight and removed the pins. OK now. 
All the commercial products I used that have bases need more work to better hide their bases. |
| August 15, 2011
Backdrops - I am undecided about backdrops. Here is a picture (shown earlier) of one module with a backdrop. It is just light blue fabric (borrowed from my wife - with permission!) Draped over a sheet of styrene behind the module. 
Given the height that the modules will usually be displayed at I do not think that a plain backdrop adds much to the display. If it were a larger display with unfinished modules in the back (for staging and such) then a finished backdrop, one with buildings, scenery, etc would probably be good. There is going to be an issue when the backdrop reaches the corners. There is going to have to be a curve in the backdrop to look good. A backdrop behind the whole display might be interesting. Going to experiment with that idea. The building on the module is a Half-Relief building from NOCH. They sell several CDs with buildings on them in several scales (Z, N, TT and HO). You print out the pdf (or jpg) on the cardstock supplied (or you can supply your own) then cut them out and fold and glue. The buildings look very nice. I think the product is worth what they are asking especially since the buildings come in four scales. I may not use the HO Scale buildings but my wife will use the N and Z Scale ones. 
|
| August 15, 2011
More about Backdrops. As I was going out grocery shopping I stopped at a $ 1.25 store and picked up some light blue card stock to try s a basic backdrop. 
Adds a bit to the display but is too plain. Then I remembered I had a Faller backdrop somewhere that I had purchased a long time ago. The price tag on it said Georges Trains and I haven't been to Toronto since the 80's. This being a stiff paper that has been tightly rolled up for a few decades it was a bit of a pain to set up. The picture shows the results. It is better than the plain back drop but emphasizes the basic flatness of the modules. 
So where to go from here? I think a backdrop behind the whole display would be a good idea. Forest and rolling hills will be better than mountains. The modules need some relief so time for some hills on the left corners and some buildings on other modules. At the very least some bush or more groves of trees. It looks like I am going to be making more fences. |
| August 15, 2011
Fixed the tree and signs. A quick search on the internet found the CMYK value for the Hunter green we are using for the fascias. It is CMYK # 89, 42, 98, 48. This prints closer to the painted colour. Good enough for now. Reflocked the tree, it might be too dark now but it blends in better than the spring colour it used to be. 
|
| Last weekend in August and first (long) weekend in September
Having thought about the two foot corner and having four by G4 straights and two pieces of flex track on hand, I proceeded to make one. I glued four pieces of Woodland Scenics 1' x 2' x 1/2" foam sheets to make a two foot square. Mistake the pieces are a nominal 1' x 2' so my square was a bit off. A bit of bodging and it was OK. The next issue is the flex track needs to be on a raised roadbed to match the Tillig Bedding track. I used N-Scale road bed and .040' styrene strips on top of that. I used weathered HOn3 ties to fill in the spaces at the end of the flex track. A good idea - the ties fit near perfectly, and a bad idea - the colour ran a bit when I ballasted them. After that had dried came my scenery nemesis - ballasting. The track is ballasted but on close view looks crappy. When time permits I will dig it up - one of the benefits of Scenic Cement is it is soft and can be removed - and do it again. So how does it look? Equipment does look better on the wider curve. Now to decide what to do scenically to the corner to remove the flatness but still leave the view of the trains on the wider curve. Lessons learned - Don't rush. You'll just have to go back and do it again i.e. ballasting. Had trouble with the fascias until I trimmed the foam edges straight. WS foam bits are nominal sizes. They vary a bit from the advertised dimensions. If you need pieces that are exactly the same size buy extras and pick a set that matches. Now I need the track for another standard corner. Two Foot Corner under construction. 
|
| Last weekend in August and first (long) weekend in September
A few images of a near finished (ends, back and bottom need painting. Need back fascia. Need more scenery) Two Foot Corner. Current state of the Two Foot Corner. 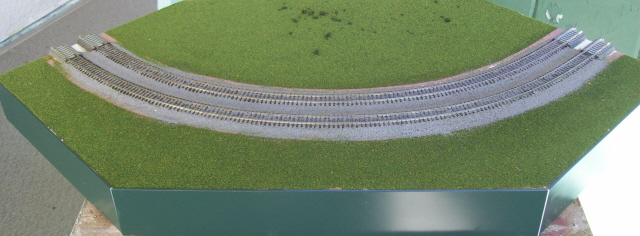
Triang equipment on the Two Foot Corner. 
Roco Loco with Tillig equipment on the Two Foot Corner. 
|
| October 10, 2011
All the modules that I will be using for the display at Trains 2011 are now useable. They could all use work, touch up and more scenery but will do for now. Still need to work out the power setup. Current state of the display. Note that it is reversed. The long leg should be on the left and the short leg on the right but the space I have here does not allow me to set it up that way. 
Here is a short video of the first run on the L-Shaped display. The Hi-tech power supply is hidden behind the trees in the upper left corner. (Copper tops still work well) |
| Late November 2011
Post Trains 2011 show report. Trains has been and gone. Despite the best efforts of Murphy we had a running display. Fun was had lessons were learned. From what I can tell this was the ONLY running TT layout at a show in North America in 2011. Lessons learned.:
|
|
|
|||||
|
|
||||||
"TT-Tracks©" wordmark Copyright W.R.Dixon.
Contact Bill Dixon
Home